Showing posts with label Sewing. Show all posts

Thursday, March 11, 2010

Trinity Helping Me Quilt

**Edited to make the videos work**

Today I was finishing up the quilt blocks. Later on in the day I had a chance to cut out the sashing for my quilt! Trinity decided to help me out. ;) lol! As I was smoothing out the fabric before I cut, Trinity would pounce on it & my hands! lol! I took some video of her goofing off!


Attacking the fabric


Caught it!


She was just having too much fun!


After she wandered off, I finally got it smoothed, & cut out.


The sashing is 4" wide, and about 21" long. The finished quilt should be able to fit a twin sized bed!
(I'm hoping)


I'll take a pic of the quilt laid out sometime when I get a chance to lay it all out again.

Monday, March 8, 2010

Quilting

Well, so far my quilt is turning out! :)  Below are some pics:


The pieces laid out, & the bottom right corner is pinned & ready to sew!

Sewing the 2 triangles together.

Most quilts (well, all the ones I've read about) don't do a serge stitch. I decided to do it since the seam is a scant 1/4", and I didn't want the seams to pull apart, and I want it to last a good long time!

 All the triangles sewn together to create the small squares. I have it pieced together to see how the finished block will look like.

All the little blocks sewn together to create the larger block!
I now have all the other triangles sewn together, & pressed, & ready to be pieced together! I'll take more pics of the progress later.

Sunday, March 7, 2010

My Attempt at a Quilt

Recently I've had a fascination for quilts, and have wanted to make one for a time now. (Especially one for my hope chest for some day!) For Christmas, I got some quilting supplies. I haven't had the time since then to begin making a quilt until recently! (as in a few days ago! :-P  )  I've decided to take some pics of the process for you all on my first quilt.

I'm not going on a specific pattern exactly. Just a block style that I like. It's called the Pinwheel. (here is a link to a quilt block pattern. It's similar to what I'm doing. Only difference is I'm not doing the small triangles. Pinwheel Quilt Block ) I'm using some fabric I got in a quilting kit I bought at an antique store.


The fabric I'm using, and some of the quilting supplies I will be using. The yellow & light blue will be the pinwheel, the floral will be the sashing around the blocks (kinda like a boarder)  & then the dark blue will be the boarder around the whole quilt. (If there is enough)

Cutting the squares w/ the rotary cutter. (It's great!) The grid I'm using, the inside square is 4 1/2". W/ the seams, the quilt blocks will be a little smaller than 8 1/2". (that would be about the finished block size) The light blue fabric is under the yellow fabric.  If you decide to start up quilting, I highly recommend getting a rotary cutter! It's faster, and easier to cut pieces. My blade size is a 45mm or 60mm I think.

The blocks are cut out, and now I'm cutting it diagonally for the pinwheels. I hope to get the pinwheels sewn together maybe today or later this week.

I'll post pics of the progress!

Sunday, February 14, 2010

It's Finished!

I'm super happy! I just got my jean skirt FINISHED! (the one I've been "working on" for the last few months! lol!)  We stayed home from church today because we all have a nasty cold, so I had some pleasant free time this afternoon! Below are the pics of the rest of the process:


I sewed the over lapped parts I had pinned together.


I'm ready to sew the fabric panels on!


Front panel pinned on! (It's inside out right now)


I left about 1/2 an inch on the bottom for the hem.
(I forgot to post the pics of the patterns I made. I noted on the panel patterns I made to allow for 1/2 an inch on all sides for seam allowance & hem)


This was tricky to stitch, but not that bad! It's pinned here.


Tada!


Stitching...


The front panel is sewn on!


Front - I'm thinking of taking in the side seams a bit so it's not quite so flared out... We'll see...


Back - I'm glad with the way I stitched the back. It doesn't stick out as some I've seen. :)
I like that it's long! I can wear heels & it'll still be nice & long!

And that's my skirt!! :D Thanks for lookin'!

Tuesday, February 2, 2010

Just a Quick-y...

I just thought I'd post a quick little update.

Things are going well here! We were able to organize the warehouse area today, & now we have a nice little living space out there with rugs & rocking chairs! it's very nice! I'll try to get some pics up this week.

I also found my sewing scissors!! YAY! I have just a few of the skirt pieces cut out. Hopefully I can get the rest done tomorrow, & hopefully have a lovely new skirt by the weekend! (Yes, I'm ambitious! lol!)

Well, that's all for now!


Wednesday, January 27, 2010

Innovative baking!

With us moving in a warehouse so my dad can work on an invention project, we have learned to make do without some lovely features taken for granted in a kitchen! Namely, an oven!
Our "oven" is our lovely large roster! Things have been taking nearly twice as long to "bake", but so far it's all turned out alright! (except for the gingerbread cookies...Those, not so much...)

Today I made some Pumpkin Apple Muffins! (SOO YUMMY!) I got the recipe from Mia's blog.
I doubled the recipe when I made it, but the recipe below is just a single batch. The single batch can make 2 loaves.
I thought I would blog my process since I haven't posted anything since before Christmas!

Pumpkin Apple Muffins


In a large mixing bowl, mix together 3 cups of flour, 2 tsp. of cinnamon, 2 tsp. baking soda, & 1.5 tsp. salt
(whisk together to remove lumps)

In a separate bowl, combine 3 cups of sugar, (don't decrease the amount. I ran out of white sugar, so I substituted with brown sugar. So, I needed 6c. sugar, I used 4c. white, & 2c. brown!)
15 oz. Pumpkin puree, 4 large eggs, and 1/2 c. of vegetable oil. Combine.
Next, add 1/2 c. apple juice (she also suggests apple cider!) Mix.

Add your wet ingredients to your dry, & combine. (don't whip or mix to fast. This creates gluten, and makes the muffins dense/stiff, or something!)


Chop 1 large apple and mix into the batter. (I did large pieces)
Now it's time to bake!


Grease a muffin tin. (or use muffin cups. We didn't have any, so just used Crisco, & it worked out fine!)
I did two scoops of a papered chef scoop in each muffin spot. (about 3/4 full I would say)


Lydia happy to have helped scoop the batter into the muffin tins! (Liana helped mix everything & even cracked two eggs by herself!)


We like to shake things up a bit ;-) lol!
Bake the muffins in an oven preheated to 350* for 20-25 minutes.
 (or in a roaster @ 450* for 35 min or till done when poked w. a cake tester or toothpick.)


The finished muffins! The lighter color on the muffins are the apple chunks.
This was the first batch and was eaten up before they had a chance to cool! lol!

Now, onto some other projects!

For Christmas, Caley & I got some lovely suede fabric from our grandparents, & a skirt pattern!


The color of the fabric I got is like a soft sage green, & Caley got a lovely cranberry/Christmas red! the pattern is Simplicity  # 2516. I plan to make style D, & Caley chose A. (D is the long pinkish color, & A is the long black one.
So far I have the pattern pieces cut out. All I need to do is find my sewing scissors, & then I can cut out the fabric! I can't wait to begin!
(Don't worry! I haven't forgotten about my jean skirt project! I hope to get that finished soon, too!! lol!)

I also had to post some pics of our kitty, Trinity! She's such a character!


Playing with a piece of yarn.


About to catch some yarn!

Saturday, October 10, 2009

eBay listings

Last night I listed two doll outfit sets. One is the Blue Regency Gown & Tea Set, and the other is a replica of Felicity's Work Dress. You can view the auctions by clicking on the titles
Both auctions end on October 16.
If you know of anyone who might be interested, Please feel free to pass this post or one of the links along! :)

Below is a preview of both sets.


Tuesday, August 25, 2009

Jean Skirt - Step 2 - Pin

I have completed steps one and two for my skirt :) I will have the full directions (w/ pics!) up by the time it's finished!

Step one - Seam rip up the inside of the leg, & part of the inseam (where the pants come together). You can cut the seams, but seam ripping allows more room for errors (if it happens). It's also straighter, and doesn't take all that long to seam rip!


Step two - Pin the pointed shape from where the pants come together. (both front and back)

Front:
I seam ripped up about an inch or so below the zipper, then (make sure the jeans are laying as flat as possible) pinned it after overlapping part of the pointed pieces. Be sure not to pin the front and back together!

Back: 
I seam ripped up to just a few inches (maybe 3 or 4) below the waisband where the belt loops are. For these pants, it's just about where the bottom of the pockets are. This section was tricky to make lay flat, but it worked after a few trys!

The next step is to create a pattern for the fabric peices!

Sunday, August 23, 2009

New Skirt in the Making - Step 1 - Seam Rip

I have been wanting some new skirts recently since I enjoy wearing them more now than even last year, so I am taking a pair of jeans that are dubbed too tight and am making a skirt! (Goodbye my favorite pants!)
I got the insperation from our very good friend, Mrs. Frye!
Below is a picture of how I hope it will look once it's done. (the fabric was just placed underneathe the pants.):
Looks nice to me! (*Looks better in person*)

So. I now have to tackle seam ripping the pants before I can cut out the triangle of fabric! :)
(before)
This is the fabric I chose for the fabric panels for my new skirt.
 
 I will post pics w/ an update on the progress of my skirt throughout the week as I work on the skirt. (If I can get some time to work on it this week.)

Dickens on the Strand

This winter we plan on going to the Dickens on the Strand in Galveston, TX!
We are only going on Sat. Dec. 5 since the 6th is a Sunday.
The time period is late 1800's - early 1900's. If you attend in costume, your entrance fee is half price! (pre-ordered tickets not eligible for discount) The Dickens on the Strand is a Christmas festival kind of event!

I'm in the process of making (& planning) my costume for the event! So far I have the petticoats made (one still needs to be shortened. it's gathered netting/toole so it's quite long! This is the "fluff" to make the skirt full.)
I already have the pattern that I will be using. Here is a pic:


I'm hoping to find fabric the same deep plum color.
Instead of having it completely gathered like a prairie skirt, I plan to make a gored skirt. Meaning it will be flat (not gathered) in the front, & pleated in the back. Each pleat is a gore.

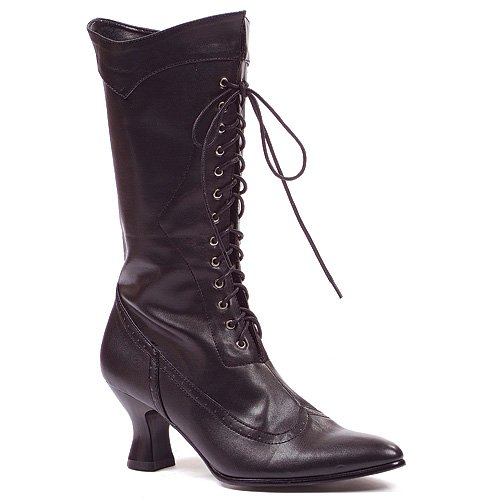
Last week I ordered my shoes, which are due to arrive this Wed.! I can't wait for them to arrive! Here is a picture of the shoes:

I got a wonderful deal on these shoes! (Sadly they are not real leather, but if the were, they would be over $100.00!)
I bought them on Amazon for $35 including shipping!
I'll post a review on the shoes along with pictures when they arrive, so check back later this week!